
I'm posting this on Scotts behalf:
Hi Everyone,
I hope this is an easy one. I'm getting ready to put my tail light
covers on, and am wondering if there is special screws that I should
use. I am trying to restore my GPIV back to original, so I would
like to use what ASC originally used. Also, how about the headlight
covers? Any special hardware for them? Thanks for the help.
Scott
Coupe Tail light cover hardware?
Coupe Tail light cover hardware?
1985 ascMcLaren Coupe - Midnight Blue
Under Restoration
Under Restoration
Here are the rear tailight cover gaskets. If you notice, there are "gaskets" to go around the edges of the covers when installing:

There are also screws that fit well in the covers...ask Hank in Florida (www.ascmclaren.com) and he can send you the gaskets and screws.
The screws are nothing special and I can probably figure out the right size by taking them to the hardware store and matching them.
They are regular phillips head self-tapping screws. They are not very long. I don't know if I would call them sheet metal screws, they may be wood screws.
-Mike
There are also screws that fit well in the covers...ask Hank in Florida (www.ascmclaren.com) and he can send you the gaskets and screws.
The screws are nothing special and I can probably figure out the right size by taking them to the hardware store and matching them.
They are regular phillips head self-tapping screws. They are not very long. I don't know if I would call them sheet metal screws, they may be wood screws.
-Mike
1985 ascMcLaren Coupe - Midnight Blue
Under Restoration
Under Restoration

Thanks Mike, this is exactly what I was looking for. I have the covers. They came with the car when I bought it, but no gaskets or hardware. Guess I need to give Hank a call before I start this project. I need to place an order with him anyway, so I'll just add this on. Thanks again Mike, you are a wealth of knowledge!
Scott
Scott
1979 Capri RS, you name it and it's been modified! Check out my website.
1985 Capri GPIV, currently under restoration.
1995 Eddie Bauer Bronco with minor mods...
2006 Yamaha YZFR1. 400lbs ~ 180HP!
~ Scott
1985 Capri GPIV, currently under restoration.
1995 Eddie Bauer Bronco with minor mods...
2006 Yamaha YZFR1. 400lbs ~ 180HP!
~ Scott
-
jeffmclaren

- Posts: 61
- Joined: Mon Aug 30, 2004 7:32 pm
- Location: Fort Wayne, IN
- Contact:
I got a set of tailight covers from Hank off ebay, and when i went to put them on, the screw holes in the stock bumper cover are way too big, but the screws that fit the covers are like a #6, and in the two side screw holes i can see where there is a plastic insert type of deal that the screw will screw into. make sense? I think we need these inserts, so that we can use the correct size screw, because i'm sure as hell not going to countersink these brittle  covers any larger.
covers any larger.1985 ASC McLaren coupe
Midnight Blue
Midnight Blue
My rear bumper cover was replaced so I never saw the holes.
Have you tried one of those plastic screw inserts they sell for hanging things in wall board? The kind that expand when the screw goes in. I have used them on various other things than just wallboard and they work ok. They are an easy fix for an interior screw hole (in the car) that is stripped.
Maybe somebody else with original covers can pipe up. I was under the impression that they just thread into the cover.
-Mike
Have you tried one of those plastic screw inserts they sell for hanging things in wall board? The kind that expand when the screw goes in. I have used them on various other things than just wallboard and they work ok. They are an easy fix for an interior screw hole (in the car) that is stripped.
Maybe somebody else with original covers can pipe up. I was under the impression that they just thread into the cover.
-Mike
1985 ascMcLaren Coupe - Midnight Blue
Under Restoration
Under Restoration
-
Sandy

- Posts: 5965
- Joined: Thu Aug 26, 2004 5:13 am
- Location: Northern New Jersey GSP Exit 148
- Contact:
.
Originally, there were NO holes on the rear fascia (Flat black part) to receive the screws! The screw was placed at ascMcLaren into the small holes (3) in the taillight cover, and then screwed in using a power screw driver. The combination of the screw's point and the power driver "put" the hole in. It is possible that the case herein happened from a prior owner frequently taking out & putting in the screws for frequent cleaning of the covers (Yes, I know they tend to leak water when you wash the car). I think that I'd try filling the holes with plastic filler, using a toothpick so as not to get the filler on any other place, but the hole, and let it harden for a couple days, then try using the same original screws to screw into/thru the filler.
Good Luck
Good Luck
Sandy passed away in 2012. He will be forever missed.
1990 Final Car prior to the 12 Silver Anny Editions
1990 Silver Pearl Anny Edition
1986 Coupe Full Pkg #109 of 114.
http://public.fotki.com/ascmclaren/ascm ... _mclarens/
1990 Final Car prior to the 12 Silver Anny Editions
1990 Silver Pearl Anny Edition
1986 Coupe Full Pkg #109 of 114.
http://public.fotki.com/ascmclaren/ascm ... _mclarens/
-
jeffmclaren
- Posts: 61
- Joined: Mon Aug 30, 2004 7:32 pm
- Location: Fort Wayne, IN
- Contact:
Re: .
Yeah, that is what i had in mind also- some type of plastic filler, so i could get the hole back to a little smaller size.Sandy wrote:Originally, there were NO holes on the rear fascia (Flat black part) to receive the screws! The screw was placed at ascMcLaren into the small holes (3) in the taillight cover, and then screwed in using a power screw driver. The combination of the screw's point and the power driver "put" the hole in. It is possible that the case herein happened from a prior owner frequently taking out & putting in the screws for frequent cleaning of the covers (Yes, I know they tend to leak water when you wash the car). I think that I'd try filling the holes with plastic filler, using a toothpick so as not to get the filler on any other place, but the hole, and let it harden for a couple days, then try using the same original screws to screw into/thru the filler.
Good Luck
Sandy, so the bumper cover didnt have any type of plastic insert in it?
The screw just threaded right into the cover?
1985 ASC McLaren coupe
Midnight Blue
Midnight Blue
-
Sandy
- Posts: 5965
- Joined: Thu Aug 26, 2004 5:13 am
- Location: Northern New Jersey GSP Exit 148
- Contact:
.
Yes. They actually did it THAT way as they never intended for owners to be taking them off ! However, over time, they do get dirty in there, and purists would want to remove & clean. I had mine off just once. Getting them back on was a killer, and I vowed never to take them off again.
Sandy passed away in 2012. He will be forever missed.
1990 Final Car prior to the 12 Silver Anny Editions
1990 Silver Pearl Anny Edition
1986 Coupe Full Pkg #109 of 114.
http://public.fotki.com/ascmclaren/ascm ... _mclarens/
1990 Final Car prior to the 12 Silver Anny Editions
1990 Silver Pearl Anny Edition
1986 Coupe Full Pkg #109 of 114.
http://public.fotki.com/ascmclaren/ascm ... _mclarens/

My wife bought me the head light and tail light covers for my birthday back in November. Now that the weather is getting nice, I would like to install them. I see below there is a gasket kit for the tail light covers, Does anyone have a part # for these? I don't see them on Hank's website. I want to order them and install them ASAP. Also, does anyone have detailed pics of the rear covers installed with the gaskets? Most of the pics I've seen are installed without the gaskets.
negusm wrote:Here are the rear tailight cover gaskets. If you notice, there are "gaskets" to go around the edges of the covers when installing:
There are also screws that fit well in the covers...ask Hank in Florida (www.ascmclaren.com) and he can send you the gaskets and screws.
The screws are nothing special and I can probably figure out the right size by taking them to the hardware store and matching them.
They are regular phillips head self-tapping screws. They are not very long. I don't know if I would call them sheet metal screws, they may be wood screws.
-Mike

I didn't use the gaskets cause I couldn't figure out how they went on w/o looking horrible. My holes were slightly off so this is what I had to do...

Powdercoated black


Powdercoated black
Mike
86 AscMcLaren Capri Coupe - #026 | 11.4@118 | 290/322
86 9L SVO
www.mikemartinelli.com
www.baldguydesigns.net

86 AscMcLaren Capri Coupe - #026 | 11.4@118 | 290/322
86 9L SVO
www.mikemartinelli.com
www.baldguydesigns.net
Mike,
Do you have any issues with the inside of the covers getting dirty or streaked when you wash the car because you don't have the gaskets? I do like the way they look without the gaskets.
The washer is a good idea, it will spread out the preasure of the screw and will be less likley to crack the lens.
Do you have any issues with the inside of the covers getting dirty or streaked when you wash the car because you don't have the gaskets? I do like the way they look without the gaskets.
The washer is a good idea, it will spread out the preasure of the screw and will be less likley to crack the lens.
The water does get in there when I wash but it doesn't look bad when it dries...Like I said the gaskets weren't fitting correctly and looked stupid so I didn't use them...
I had to use the washer because my holes didn't quite line up...the washers are just big enough to cover up where I had to elongate a couple of holes...plus yea it spreads out the load...
I had to use the washer because my holes didn't quite line up...the washers are just big enough to cover up where I had to elongate a couple of holes...plus yea it spreads out the load...
Mike
86 AscMcLaren Capri Coupe - #026 | 11.4@118 | 290/322
86 9L SVO
www.mikemartinelli.com
www.baldguydesigns.net
86 AscMcLaren Capri Coupe - #026 | 11.4@118 | 290/322
86 9L SVO
www.mikemartinelli.com
www.baldguydesigns.net
I finally have some pics of the headlight and tail light covers installed.
Mike, I took your advice and used the hardware you recommended with the addition of rubber washers behind the cover (between the lens and the body).
BTW 8 days after I installed them, I closed the hood while at a local cruise night and cracked the passenger side cover (':(') (':banghead:')
The next day I ordered a replacement ($125 + shipping). As it turned out the corner of the hood was to low and smashed into the cover. I raised the hood bumper/adjuster a little to give me clearance and no longer slam the hood closed.
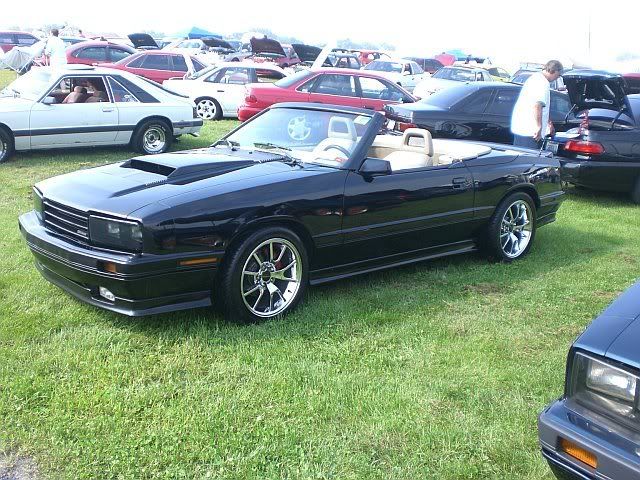


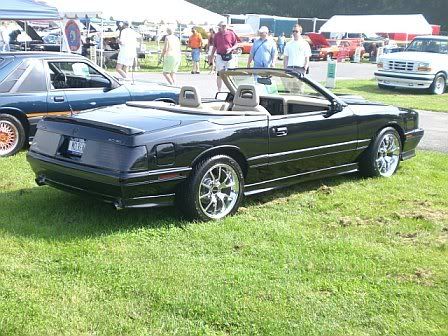


Mike, I took your advice and used the hardware you recommended with the addition of rubber washers behind the cover (between the lens and the body).
BTW 8 days after I installed them, I closed the hood while at a local cruise night and cracked the passenger side cover (':(') (':banghead:')
The next day I ordered a replacement ($125 + shipping). As it turned out the corner of the hood was to low and smashed into the cover. I raised the hood bumper/adjuster a little to give me clearance and no longer slam the hood closed.
